
CAUTION:PLEASE TURN OFF YOUR CFL/PL-L lighting when your head is within 3-4 feet of them. They WILL do permanent damage to your eyes and you won't notice it until it's too late. You've been warned. Please use a normal incandescent bulb or room lighting.... when your head is in the cab. 
Update: Using 4 55w lamps on a 220W Fulham Workhorse ballast will void the 5 year warranty! Please use only 3 55w lamps per ballast. 2 Red leads per lamp, according to wiring diagram #11. (Fulham customer service is awesome!)
If you’re using the sockets pictured... they're what are called "shunted" sockets. Simply strip the ends of two red leads straight from the ballast and just push one into each of the paired holes closest to the edge of the socket.
If your sockets are NOT shunted.... this wiring information still applies, though the pictures may look a bit different than your sockets.
I’ve been working with remote ballast CFLs lately and have run into a few questions that I had to dig up answers for. I’ve snapped a few photos to help others see how simple it is to use these lamps.
Feel free to ask questions for clarification.
First off, the equipment we'll be working with.
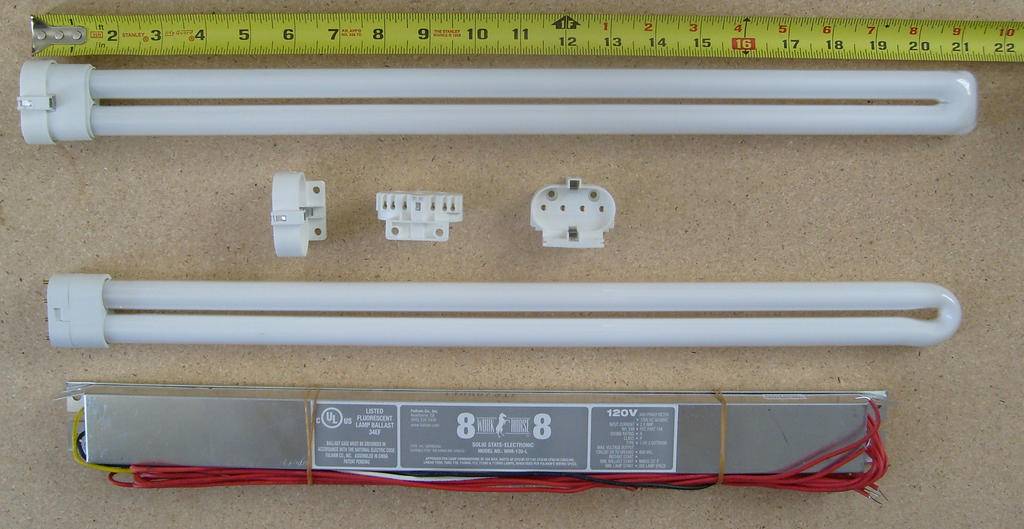
Parts
A Fulham Workhorse 8 220w ballast
2G11 Sockets
55w Dulux-L lamps
4 small screws (not pictured)
Tools
Wire cutters
Wire strippers
Screwdriver
Drill (optional for pre-drilling holes)
As you can see from the measuring tape, 22" is plenty of clearance for a 55w lamp and socket while still leaving room to replace the lamp easily. There MAY be other lamps that will not fit in this space that are 55w, be sure to check your lamp length before ordering for a small space like 22".
This is a closeup of the front and back of the socket, 2G11.
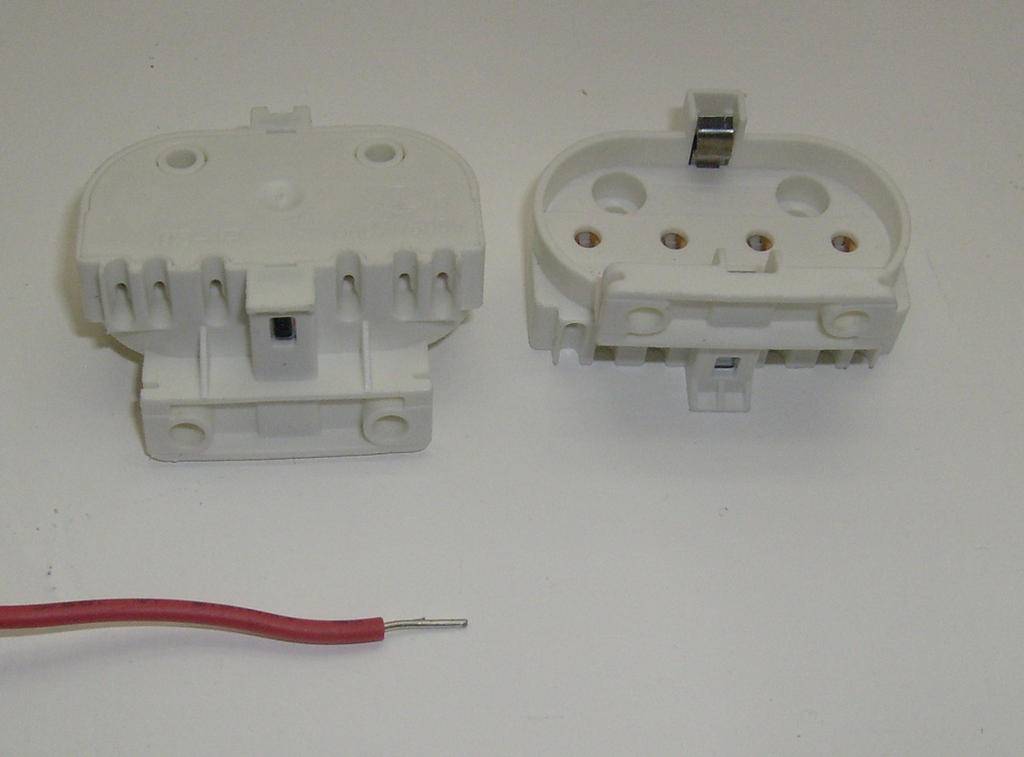
The sockets have a total of 6 places to insert wires. We’ll only be using 4 on each socket and these are the ‘paired’ holes closest to the edge on either side of the socket. The two holes in the middle of the socket will NOT be used.
The wire you see in the photo has less than half an inch of the end stripped to the bare wire. When the bare end of the wire is pushed into one of the holes, the metal contacts inside automatically grab it.
If you want to remove a wire you pushed in, insert another bare wire end ‘next’ to the wire you want to remove. Inside it will push against a release, freeing the wire. (It may take a bit of messing around with before you get used to doing it easily/quickly)
Socket With 2 Wires Inserted

Here I’ve stripped the ends of a piece of wire, inserted both ends into two of the holes closest to the edge of the socket and cut them off at an equal length. You may want to leave a few more inches of wire than I did in the photo, to make things easier on yourself.
Socket with Paired Wires
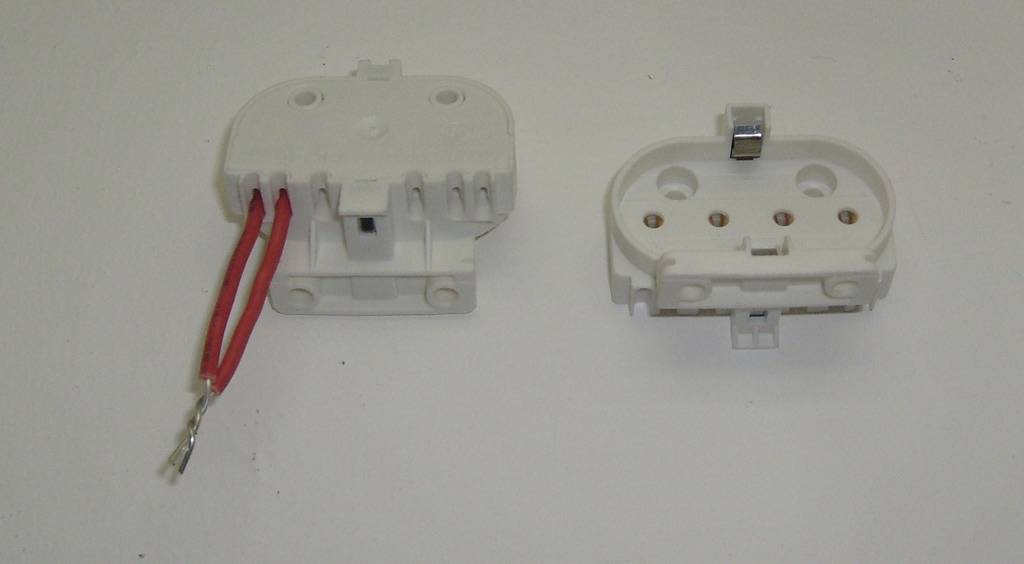
Here I’ve stripped the ends of the wires and twisted them together to make a good contact with each other. It is important to connect the wires together like this to make a single wire before connecting to the ballast wires.
If you’re using the sockets pictured... they're what are called "shunted" sockets. Simply strip the ends of two red leads straight from the ballast and just push one into each of the paired holes closest to the edge of the socket.
Both Sides of the Socket Wired and Ready
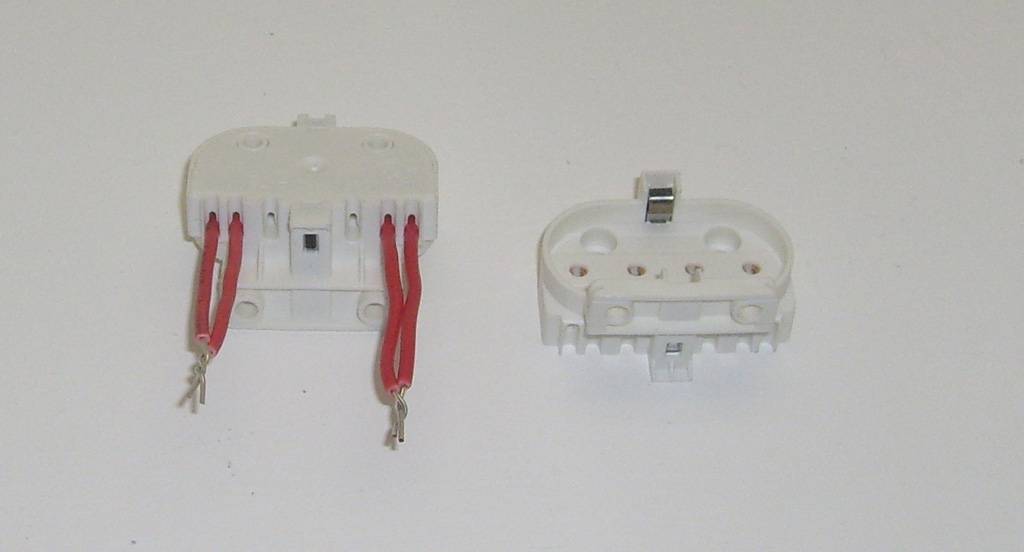
This socket is ready to be put in place and used. I’m sorry that the photo uses red wiring for both sides of the socket, I don’t have any yellow wire. One wire will be attached to a yellow lead from the ballast and one will be attached to a red lead from the ballast.
Socket with added wires connected to ballast leads
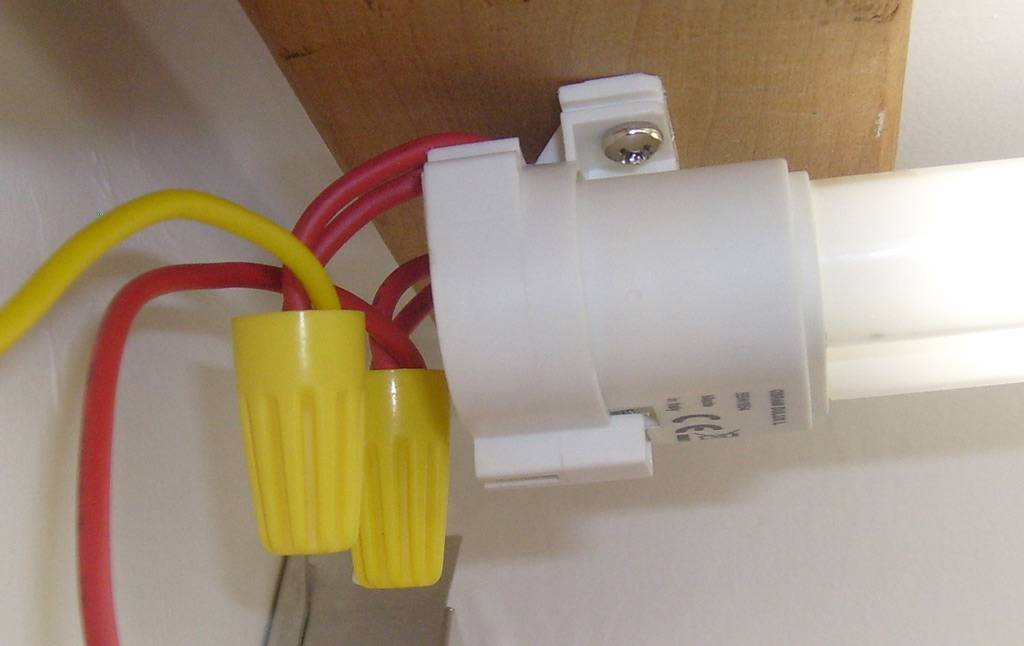
As per the wiring diagram for the Fulham ballasts, one set to the red lead, one set to the yellow lead. The socket itself is mounted to the wood with two simple screws. I pre-drill my screw holes to allow easier insertion and to prevent MDF board from splitting.
And here's a shot of the cab lit up with 110w of mounted and wired Remote CFL power.
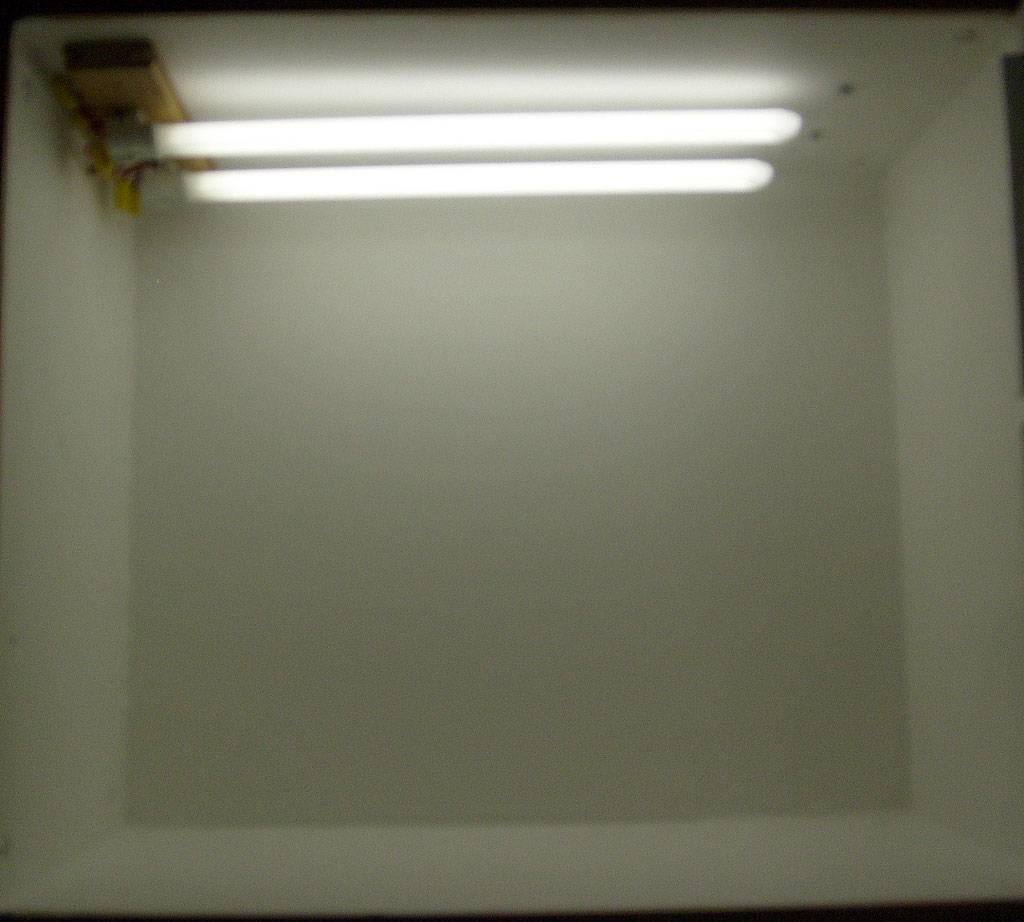
Well, there they are, all lit up and happy. I know, the photo really sucks but I have too much to do right now to replace it.
NOTE: The ballast has a black and a white lead wire that need to be connected to a standard 110V plug. Black to black, white to white. These lamps do not have a ground wire.
The fuzzy dots to the right of the end of the lamps are screws in the ceiling. I have a thin piece of metal wire wrapped around the end of each lamp, holding it to the screw to keep the lamp from sagging. (The sockets are designed to be used in reflectors that have a retaining clip built into it that the lamp snaps into.)
I wired the sockets according to the pdf on fulham ballasts. The diagram only shows 3 lamps (for simplicity) but the Workhorse 8 ballast has 6 leads for connecting up to 6 lamps. This cab is using 2 55w lamps for a total of 110W while my flower cabinet uses 4 55w lamps at 220w.
The cab currently has 2 5400K 55w lamps. The package states 3000lm which I imagine is 3000 lumens, not the 4,800 lumens that was stated on the 1000bulbs.com website. Not really an issue as the spectrum is dynamite for veg.
Hope this clears up any confusion for folks, I know it took me a few minutes of digging to find this stuff over the last few months. Enjoy!
Update: Using 4 55w lamps on a 220W Fulham Workhorse ballast will void the 5 year warranty! Please use only 3 55w lamps per ballast. 2 Red leads per lamp, according to wiring diagram #11. (Fulham customer service is awesome!)
If you’re using the sockets pictured... they're what are called "shunted" sockets. Simply strip the ends of two red leads straight from the ballast and just push one into each of the paired holes closest to the edge of the socket.
If your sockets are NOT shunted.... this wiring information still applies, though the pictures may look a bit different than your sockets.
I’ve been working with remote ballast CFLs lately and have run into a few questions that I had to dig up answers for. I’ve snapped a few photos to help others see how simple it is to use these lamps.
Feel free to ask questions for clarification.
First off, the equipment we'll be working with.
Parts
A Fulham Workhorse 8 220w ballast
2G11 Sockets
55w Dulux-L lamps
4 small screws (not pictured)
Tools
Wire cutters
Wire strippers
Screwdriver
Drill (optional for pre-drilling holes)
As you can see from the measuring tape, 22" is plenty of clearance for a 55w lamp and socket while still leaving room to replace the lamp easily. There MAY be other lamps that will not fit in this space that are 55w, be sure to check your lamp length before ordering for a small space like 22".
This is a closeup of the front and back of the socket, 2G11.
The sockets have a total of 6 places to insert wires. We’ll only be using 4 on each socket and these are the ‘paired’ holes closest to the edge on either side of the socket. The two holes in the middle of the socket will NOT be used.
The wire you see in the photo has less than half an inch of the end stripped to the bare wire. When the bare end of the wire is pushed into one of the holes, the metal contacts inside automatically grab it.
If you want to remove a wire you pushed in, insert another bare wire end ‘next’ to the wire you want to remove. Inside it will push against a release, freeing the wire. (It may take a bit of messing around with before you get used to doing it easily/quickly)
Socket With 2 Wires Inserted
Here I’ve stripped the ends of a piece of wire, inserted both ends into two of the holes closest to the edge of the socket and cut them off at an equal length. You may want to leave a few more inches of wire than I did in the photo, to make things easier on yourself.
Socket with Paired Wires
Here I’ve stripped the ends of the wires and twisted them together to make a good contact with each other. It is important to connect the wires together like this to make a single wire before connecting to the ballast wires.
If you’re using the sockets pictured... they're what are called "shunted" sockets. Simply strip the ends of two red leads straight from the ballast and just push one into each of the paired holes closest to the edge of the socket.
Both Sides of the Socket Wired and Ready
This socket is ready to be put in place and used. I’m sorry that the photo uses red wiring for both sides of the socket, I don’t have any yellow wire. One wire will be attached to a yellow lead from the ballast and one will be attached to a red lead from the ballast.
Socket with added wires connected to ballast leads
As per the wiring diagram for the Fulham ballasts, one set to the red lead, one set to the yellow lead. The socket itself is mounted to the wood with two simple screws. I pre-drill my screw holes to allow easier insertion and to prevent MDF board from splitting.
And here's a shot of the cab lit up with 110w of mounted and wired Remote CFL power.
Well, there they are, all lit up and happy. I know, the photo really sucks but I have too much to do right now to replace it.
NOTE: The ballast has a black and a white lead wire that need to be connected to a standard 110V plug. Black to black, white to white. These lamps do not have a ground wire.
The fuzzy dots to the right of the end of the lamps are screws in the ceiling. I have a thin piece of metal wire wrapped around the end of each lamp, holding it to the screw to keep the lamp from sagging. (The sockets are designed to be used in reflectors that have a retaining clip built into it that the lamp snaps into.)
I wired the sockets according to the pdf on fulham ballasts. The diagram only shows 3 lamps (for simplicity) but the Workhorse 8 ballast has 6 leads for connecting up to 6 lamps. This cab is using 2 55w lamps for a total of 110W while my flower cabinet uses 4 55w lamps at 220w.
The cab currently has 2 5400K 55w lamps. The package states 3000lm which I imagine is 3000 lumens, not the 4,800 lumens that was stated on the 1000bulbs.com website. Not really an issue as the spectrum is dynamite for veg.
Hope this clears up any confusion for folks, I know it took me a few minutes of digging to find this stuff over the last few months. Enjoy!
Last edited:

