What's new
  • Happy Birthday ICMag! Been 20 years since Gypsy Nirvana created the forum! We are celebrating with a 4/20 Giveaway and by launching a new Patreon tier called "420club". You can read more here.
  • Important notice: ICMag's T.O.U. has been updated. Please review it here. For your convenience, it is also available in the main forum menu, under 'Quick Links"!

DIY fiberglass reinforced E&F build

kaljukajakas

Active member
I wanted a 20" wide by 40" long by 12" high reservoir and an 8" high table to fully use the space in my cabinet. I couldn't buy one so I decided to build it. One that would last for a good many years.

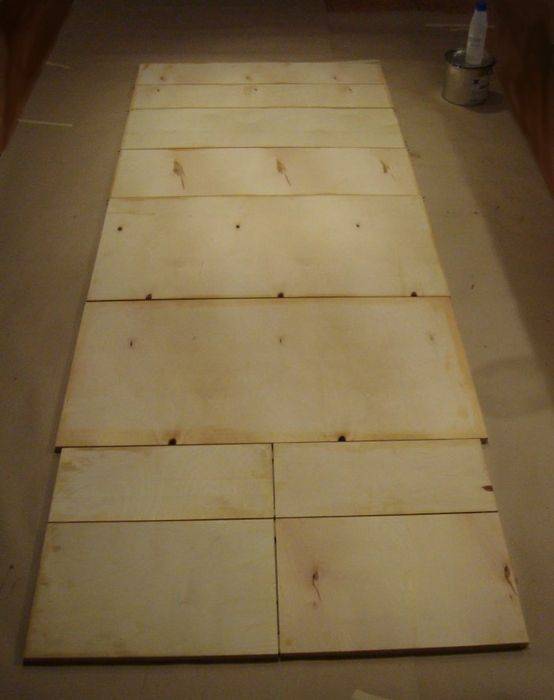
First of all, I got some 3/4" exterior grade plywood, which was cut up. Then the edges were painted with polyester resin, cured, and covered with masking tape. Some matches were used as spacers between the pieces for the next step.


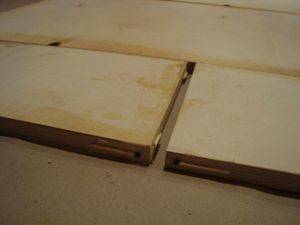
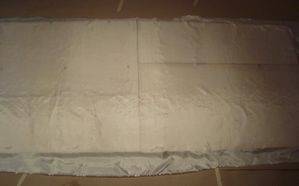
The masking tape and matches are needed to keep the plywood panels from sticking to each other and getting the edges messy when several panels are covered with fiberglass side-by-side. I used polyester resin. Just laid out some panels, stretched some fiberglass cloth over them and worked in the resin with a squegee. Covering plywood with fiberglass while the boxes are assembled would have been a real PITA. You'd end up a mess of frayed fibers that stick everywhere, the fiberglass pieces would slide about etc...


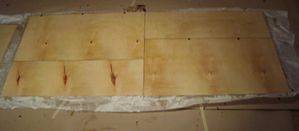
Then the excess cloth was cut off with a sharp knife, the masking tape was removed and the pieces were glued together with epoxy and then screwed together as the glue was curing. The fiberglassed side is of course the interior. Fiberglassing the exterior didn't seem necessary.


If enough epoxy was used the boxes will already be watertight. To make them even more watertight I applied 4" wide seam reinforcement tape to the interior corners. First I painted the corners with polyester resin, then applied the tape so it stuck immediately and then brushed on some more resin to saturate the tape. Then I also painted the exterior of the boxes with resin and gave the entire interior an extra coat.


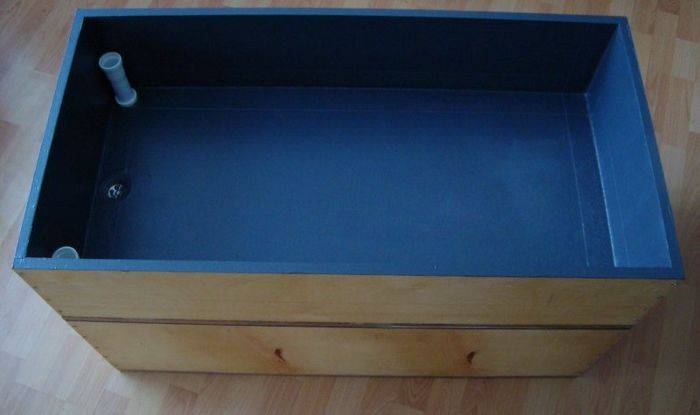
Next three holes were drilled in the table and E&F fittings were installed. Just some 1 1/2" sewer pipes that slide up and down inside two female pieces set into the table for double overflows and a drain from a sink for the pump. Again, lots of resin makes everything waterproof. I used about a gallon of resins (epoxy and polyester) for the entire build.


Finally a couple of coats of dark grey potable epoxy paint on all surfaces that come in contact with water as a finishing touch.

 
Last edited:
Y

yamaha_1fan

Thats pretty cool. Once in a while I think of building something like that but wonder the cost effectiveness. How much did the resisn and fiberglass cost to build something like that?

Is the resin 2 part that you have to mix? Did you use any filler in the resisn? My only experience with fiberglass has been on jetskis
 

kaljukajakas

Active member
I used two part polyester resin for most of the build. 3 quarts of resin plus the hardener was about 25$, the fiberglass was about 10$ and a quart of epoxy and hardener was about 20$. No fillers were used and as can be seen in the fittings pictures the cured fiberglass+resin coating is pretty clear. The epoxy is somewhat unnecessary though. A coat of polyester could have been dyed black and once cured it's also pretty inert. Or for an extra nice looking finish, the freshly cut plywood could have been dyed with the darkest wood stain you can find. Good quality stained plywood that's properly sanded and covered with clear fiberglass would look pretty nice. You could use it as a coffee table when not growing :D
 

B420

Member
Looks good. Can you explain your overflow fittings more? I like the idea of using PVC pieces but not too sure exactly what kind of piece you are using.
 

kaljukajakas

Active member
Just take a regular plastic sewer pipe, the kind that bulges at one end where there's also a rubber seal. You can connect them end-to-end. Look at EFfittings2.jpg to see what I mean.

Cut the female part off one of such pipes where it starts to narrow down to the regular pipe diameter. You now have a short piece of pipe that has a groove for rubber ring in it and a slightly larger ID than the OD of the sewer pipe. This short piece can slide up and down the pipe. I just glued it inside a hole in the plywood. Had to trim the rubber though, it sat too tightly initially.
 
Last edited:

kaljukajakas

Active member
Thanks guys, it'll be a few weeks yet before it goes into service.

Hooked up a JBL ProFlow Maxi 1000 pump to the system and tested it out: table fills in 5 minutes to 6" and empties in 10 minutes. Should be OK. It's a shame though that most aquarium pumps are designed for small hoses and thus limit flow... Then again they're so cheap I could get second one.

The DIY part of this E&F build is not over though :D Can anyone guess what the following will be used for?

picture.php


picture.php


Hint: there's bunch of small holes drilled into the bottom of the plywood box (where the big hole in the 4x4x2" block of wood is). The holes are covered by a rectangular piece of felt that sits on the inside of the bottom of the box.
 

FreedomFGHTR

Active member
Veteran
Thanks guys, it'll be a few weeks yet before it goes into service.

Hooked up a JBL ProFlow Maxi 1000 pump to the system and tested it out: table fills in 5 minutes to 6" and empties in 10 minutes. Should be OK. It's a shame though that most aquarium pumps are designed for small hoses and thus limit flow... Then again they're so cheap I could get second one.

The DIY part of this E&F build is not over though :D Can anyone guess what the following will be used for?

picture.php


picture.php


Hint: there's bunch of small holes drilled into the bottom of the plywood box (where the big hole in the 4x4x2" block of wood is). The holes are covered by a rectangular piece of felt that sits on the inside of the bottom of the box.

Oh please telling me you are filling them with coco fiber.......
 

kaljukajakas

Active member
Oh please telling me you are filling them with coco fiber.......

You're on the right track... The plywood object will be used to make custom pots. Couldn't find anything I liked locally. To be specific I'll be making some 9" by 9" by 8" high pots. 8 of these will fill my table rather nicely. But the pots won't be made from plywood... Nor fiberglass.

Another hint: two common household appliances are also needed to make these pots. Also notice that there's quite a bit of caulking on the outside of the plywood box...
 
Y

yamaha_1fan

Kal, what do you think it would cost to fiberglass a 4x8 table w/ 6" sides? I am not interested in looks, just want to keep it waterproof. There will be several tables so the supplies would be bought in large qty. I could price out the resisn/hardner but I really dont know how much I would use for that many tables

I have figured $900 in pond liner to do 16 4x8 tables. Think fiberglass/resin would be much cheaper? Then there is the labor factor to apply. Pond liner will be about 10 minutes per table.
 

ChaosCatalunya

5.2 club is now 8.1 club...
Veteran
Always interesting projects mr kaljukajakas !

I made my first homemade NFT table from fiberglass resin painted on an 8x4' of chipboard [dumb move, ply is far better] with 1"x2" baton running down 3 sides [8,8,4] and 3 strips of dowel to divide channels, no glass fibre was used or needed as it was strong enough construction with glue and screws, the fiberglass resin was just used to waterproof it.

It worked great, better than some of ones we knocked up later, plastic liners on bare wood are a bad move, sooner or later you make a hole in it and your lovely hydro solution gets contaminated with wood resins/glues/chemicals ... the worst I found was the formaldehyde in MDF board... real dead plants, real quick.

I got all my ideas for homemade hydro systems from Molyneux's "A Practical guide to NFT" ... a brilliant book that explains exactly what you need to know, why and how, not just for NFT. IMO, his guide to materials, safe and otherwise, it one of the most important things I have ever read.... which brings me on to your sink drain... I hope it is not metal [you can use non ferrous stainless] and is plastic, it will probably cause trouble if it is.

I am really looking forward to seeing these custom pots you are making

K++
 

kaljukajakas

Active member
The cost depends on a number of factors... The price or resin can vary a great deal depending on whether you buy a quart from a hobby shop or get a big drum straight from a specialist dealer. Thickness of the fiberglass cloth or mat also has a big influence as it determines how much resin you need and naturally you want to buy it by the roll. Also, fiberglass tape can be surprisingly expensive.

I used very thin fiberglass cloth and less than 3 quarts of polyester resin. Total area covered was about 25 square feet for a cost of about 40$. Epoxy is extra.

A 4' by 8' table with 6" sides is about 44 square feet. I could build it for about 40/25*44 = 77$. Probably less as it'd be possible to get a better deal on the materials and there would be less waste (no left over half-rolls of tape etc) if several tables are built at once. So it's about as expensive as the pond liner if you get a good deal.

The labor factor though is pretty significant. I figure at least 4 hours of work per table minimum. Waiting for stuff to cure, chasing down wrinkles... It's not exactly the most pleasant of activities either (uncured resin stinks!).


Another option I considered for this build was getting waterproof plywood. The kind that's covered with a thin black coat of tough polyphenol resin (similar to what billiard balls are made of). The plywood itself would have been about twice as expensive but there'd have been no need to cover all of it with fiberglass, just glue and screw the pieces together, apply fiberglass tape to the inside corners and paint all edges. Though I'm not sure how well the polyester resin would have stuck to the polyphenol coating, especially to a shiny smooth one...
 

kaljukajakas

Active member
I made my first homemade NFT table from fiberglass resin painted on an 8x4' of chipboard [dumb move, ply is far better] with 1"x2" baton running down 3 sides [8,8,4] and 3 strips of dowel to divide channels, no glass fibre was used or needed as it was strong enough construction with glue and screws, the fiberglass resin was just used to waterproof it.

My first try was a DWC reservoir. Built it from 40mm thick polystyrene foam and covered all of it with three coats of fiberglass and epoxy. Super light and sturdy but it took something like a week to make... It had a lid with access hatces and pot holders, integrated aluminium scrog screen etc... :D


which brings me on to your sink drain... I hope it is not metal [you can use non ferrous stainless] and is plastic, it will probably cause trouble if it is.

It's a regular stainless steel drain, the plastic bits are polypropylene. The stuff's cheap but still designed to take decades of abuse, including drain cleaners, boiling hot water etc. No problems there.

I am really looking forward to seeing these custom pots you are making

Me too, hoping to get round to it late next week. Anyway, enough with the mystery - the plywood rig is a vacuum forming mould. It took just an hour or two to clobber together from pieces of scrap so I guessed it would be hard to recognize... The household appliances I hinted at are an oven and a vacuum cleaner, BTW.

Basically a piece of polystyrene sheet is clamped in the rectangular frame and placed in a hot oven until the plastic starts to sag. A vacuum cleaner is connected to the hole in the bottom of the mould. The frame with the hot plastic is placed over the top of the mold, the vacuum is switched on and in a few seconds a custom pot should be formed. Although in this case, as the mold is so deep, the hot plastic probably has to be pre-stretched a bit...
 

ChaosCatalunya

5.2 club is now 8.1 club...
Veteran
My first try was a DWC reservoir. Built it from 40mm thick polystyrene foam and covered all of it with three coats of fiberglass and epoxy. Super light and sturdy but it took something like a week to make... It had a lid with access hatces and pot holders, integrated aluminium scrog screen etc... :D

Excellent idea, I had never thought of using it on Polystyrene, that has got me thinking .... could be really good for propagator bases/systems


It's a regular stainless steel drain, the plastic bits are polypropylene. The stuff's cheap but still designed to take decades of abuse, including drain cleaners, boiling hot water etc. No problems there.

Cool, that will be fine. My local hydro shop has a customer who works with stainless and has made himself a stunning 100% stainless steel system, aparently it works great and he has not managed to electrocute himself yet either. Sadly no pictures of that one !


Me too, hoping to get round to it late next week. Anyway, enough with the mystery - the plywood rig is a vacuum forming mould. It took just an hour or two to clobber together from pieces of scrap so I guessed it would be hard to recognize... The household appliances I hinted at are an oven and a vacuum cleaner, BTW.

Basically a piece of polystyrene sheet is clamped in the rectangular frame and placed in a hot oven until the plastic starts to sag. A vacuum cleaner is connected to the hole in the bottom of the mould. The frame with the hot plastic is placed over the top of the mold, the vacuum is switched on and in a few seconds a custom pot should be formed. Although in this case, as the mold is so deep, the hot plastic probably has to be pre-stretched a bit...

Good luck, I am really going to enjoy seeing this come together.
 

kaljukajakas

Active member
Had a try at vacuum forming a few pots from 2 mm thick polystyrene. It turns out it's pretty difficult to make a perfect pot like that without a plug assist that's well matched to the female mould. I used a 6x6" tin can covered with a T-shirt for prestretching, which resulted in rather uneven wall thicknesses...

I'll make a custom plug assist (~80% female mould volume) and also get some thicker polystyrene as the current 5:1 draw ratio means I'd be left with less than 0.5 mm thick walls using 2mm PS, which is a bit weak.


ginoberde

Member
Very nice, but how do you do that? Do you first put it in the oven, then pull it out and vacuum? Nice thread BTW
 

Latest posts

Latest posts

Top