POST NUMBER 2 HAS BEEN EDITED TO SHOW UPDATE AND FURTHER DETAIL.
Hello IC community I am happy to present yet another TAG challenge is underway. I know that some folk will not agree with what I have to say, or my views regarding TAG and its followers (You know who I refer to). All I ask is for you to either back out now, or refrain from posting their opinions, I would rather everyone enjoy the show.


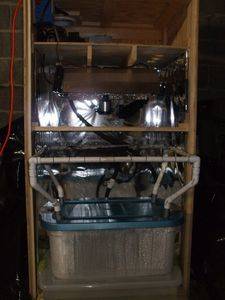
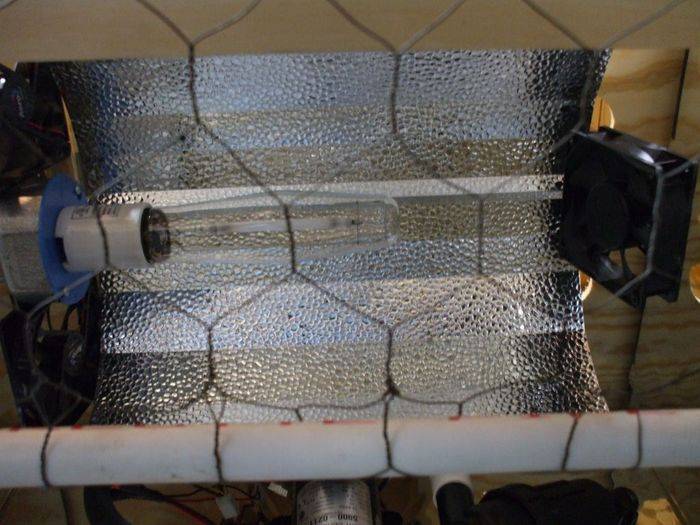
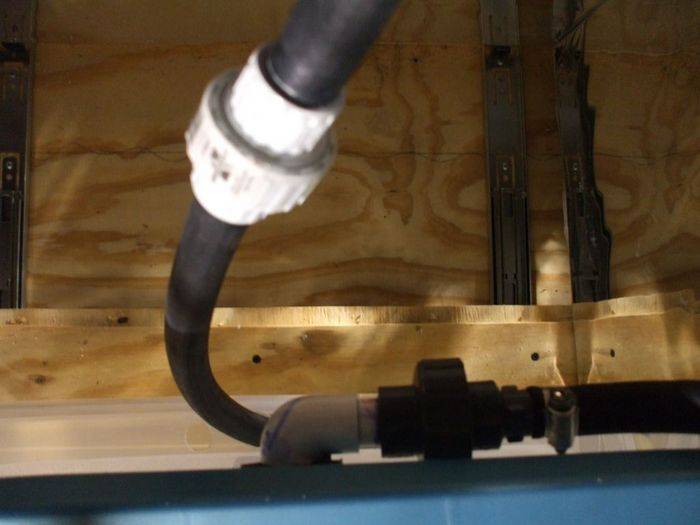
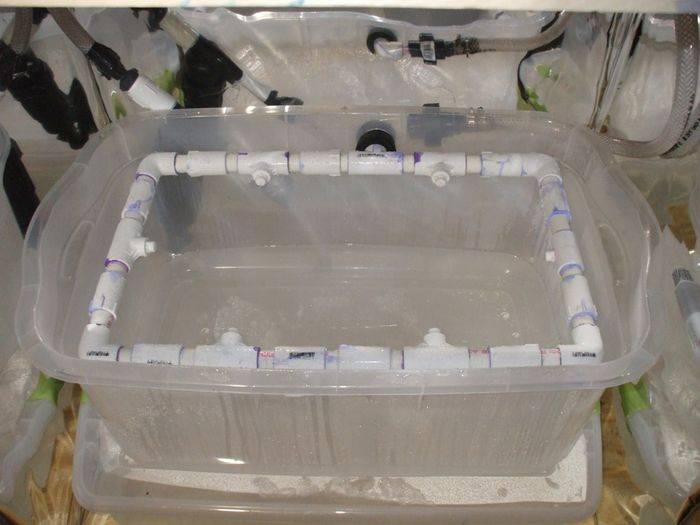
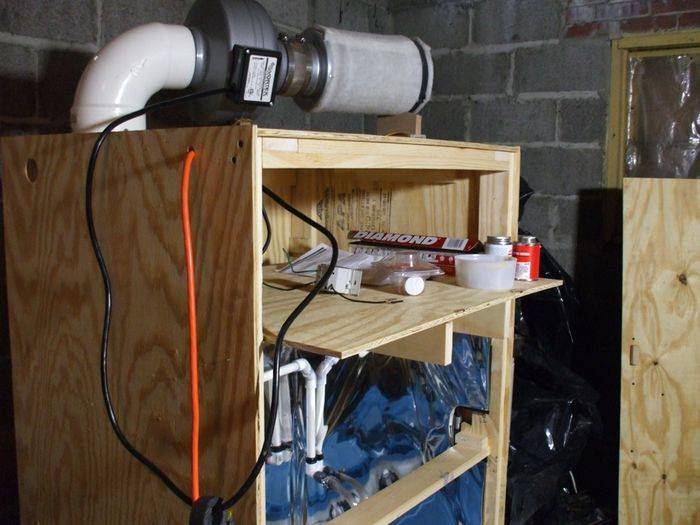
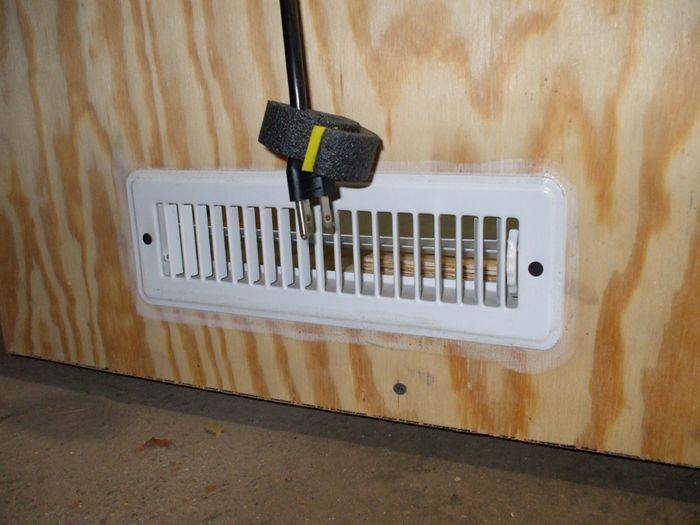
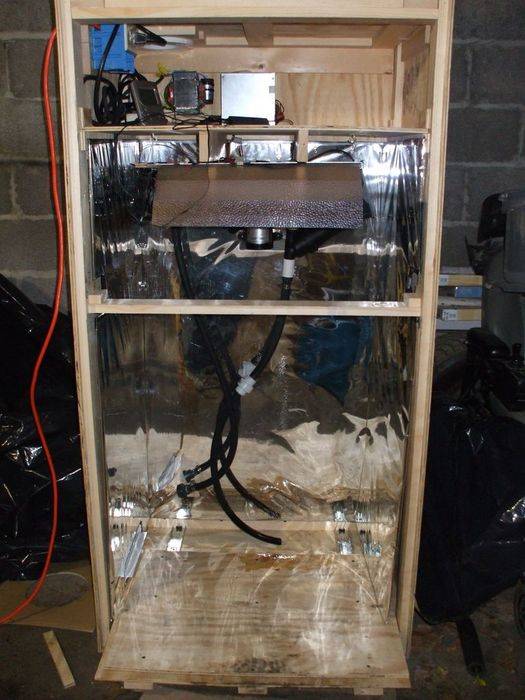
I have been building a TAG system for quite some time now and I am nearly ready to start growing. You can see from my pictures that I have already got everything that I need but ferts. All I have left in the build stage is to light proof the reservoir and aero chamber. I am ordering Dutch Master ONE fertilizers, and I was going to hold off on any supplement, and additives till I get the hang of this T rue A ero G rowing technique. You can see the the floor rolls out so that I have full access to the back of the cabinet with out actually having to brake my back. The res. can easily be emptied with the floor out but if I am feeling strong I can lift the res. and stay in an upright position avoiding any back strain. From the second picture you can see the pump and irrigation lines down to the reservoir, and the aero chamber. I was using PVC pipe but switched it out to just black 80psi hose from HD... worked out perfect. The PVC caused very loud vibrations and we all know why that is not wanted when growing in a closet in your apartment lol. You can see the black hose in the third picture if you care to see how it looks. You can also see the top self which is also removable, from the thord pic. That is the area where I keep the ballast, and the computer PSU that powers the fans.
I am using a CMH bulb so that I can use one bulb from start to finish, I know that my end yield may not be as high, but I really hate the orange HPS light anyway lol. I am only going to start with two seeds, and I now I will have space issues. I am already planning to top, and trim as needed until I can force flower. The plus side is that I am SCROGing so the space is manageable to some extent.
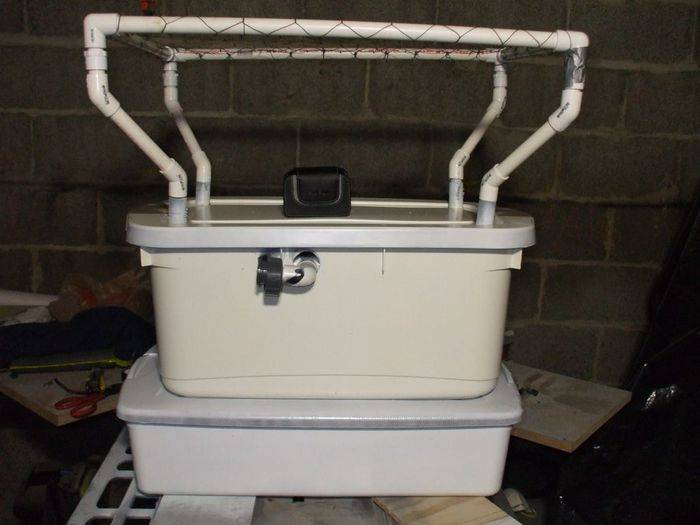
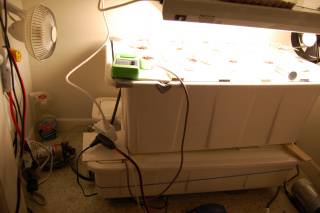
I am using a ten gallon reservoir with 8 gallons of nutes/water. I am in the process now of lightproofing the res., and aero chamber. after that I will order my nutes, and then germ my seeds. The aero chamber is something like 25 gallons, and I am using 6 misters for root zone H2O/O2 saturation. In the picture the mister are actually on full blast. That goes to show you how fine the mist is considering you cannot really even see the spray.
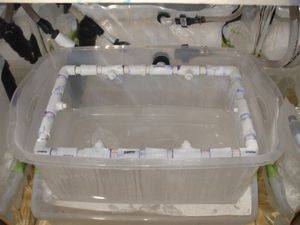
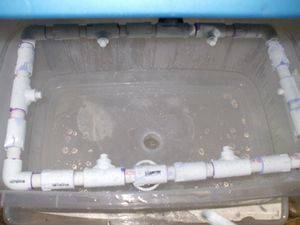
You can see the drainage system in the second picture of the aero chamber. The drain simples drains right down back into the reservoir for a very quick recycle time... you know what I mean? It gets sucked up and misted out and then quickly goes right back to the reservoir. I am putting an actual sink drain in when I get it lightproofed. The total dimentions of the aero chamber is about 27"long, 12"deep, and 17"wide. I wasn't sure if that will be enough root area for clones but I am sure to run into trouble starting from seed. As sad as it sounds if I have to once sex is determined I could alway take clones and start over. Of course that is if I even get a female considering I am starting out with only two seed lmao. (This is sounding a bit less thought out than I thought lol.) Actually I know it sound bad but once I have my hands on two female clones I know that I will be just fine I will post some more a bit later but this will give you a taste of what I have been working on.
Hello IC community I am happy to present yet another TAG challenge is underway. I know that some folk will not agree with what I have to say, or my views regarding TAG and its followers (You know who I refer to). All I ask is for you to either back out now, or refrain from posting their opinions, I would rather everyone enjoy the show.
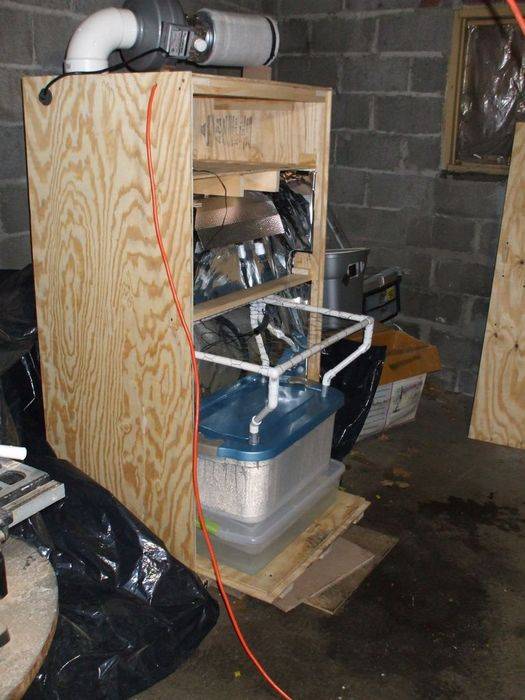
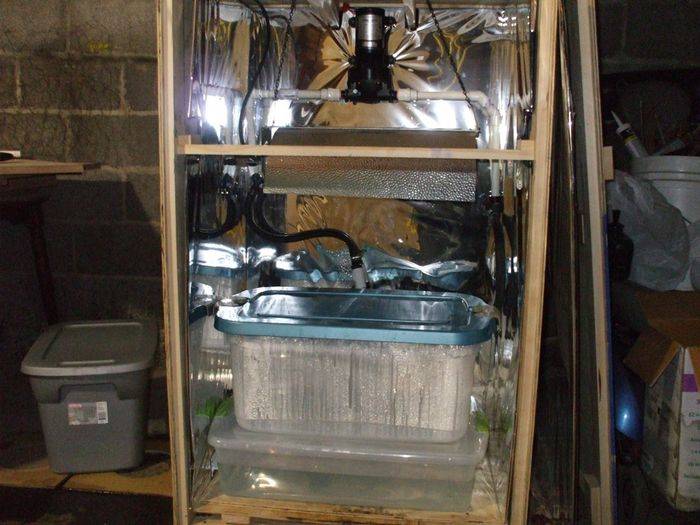

I have been building a TAG system for quite some time now and I am nearly ready to start growing. You can see from my pictures that I have already got everything that I need but ferts. All I have left in the build stage is to light proof the reservoir and aero chamber. I am ordering Dutch Master ONE fertilizers, and I was going to hold off on any supplement, and additives till I get the hang of this T rue A ero G rowing technique. You can see the the floor rolls out so that I have full access to the back of the cabinet with out actually having to brake my back. The res. can easily be emptied with the floor out but if I am feeling strong I can lift the res. and stay in an upright position avoiding any back strain. From the second picture you can see the pump and irrigation lines down to the reservoir, and the aero chamber. I was using PVC pipe but switched it out to just black 80psi hose from HD... worked out perfect. The PVC caused very loud vibrations and we all know why that is not wanted when growing in a closet in your apartment lol. You can see the black hose in the third picture if you care to see how it looks. You can also see the top self which is also removable, from the thord pic. That is the area where I keep the ballast, and the computer PSU that powers the fans.
I am using a CMH bulb so that I can use one bulb from start to finish, I know that my end yield may not be as high, but I really hate the orange HPS light anyway lol. I am only going to start with two seeds, and I now I will have space issues. I am already planning to top, and trim as needed until I can force flower. The plus side is that I am SCROGing so the space is manageable to some extent.
I am using a ten gallon reservoir with 8 gallons of nutes/water. I am in the process now of lightproofing the res., and aero chamber. after that I will order my nutes, and then germ my seeds. The aero chamber is something like 25 gallons, and I am using 6 misters for root zone H2O/O2 saturation. In the picture the mister are actually on full blast. That goes to show you how fine the mist is considering you cannot really even see the spray.
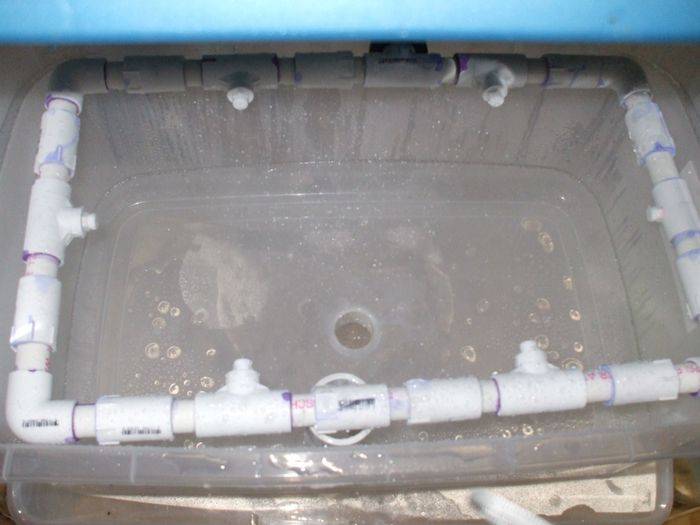
You can see the drainage system in the second picture of the aero chamber. The drain simples drains right down back into the reservoir for a very quick recycle time... you know what I mean? It gets sucked up and misted out and then quickly goes right back to the reservoir. I am putting an actual sink drain in when I get it lightproofed. The total dimentions of the aero chamber is about 27"long, 12"deep, and 17"wide. I wasn't sure if that will be enough root area for clones but I am sure to run into trouble starting from seed. As sad as it sounds if I have to once sex is determined I could alway take clones and start over. Of course that is if I even get a female considering I am starting out with only two seed lmao. (This is sounding a bit less thought out than I thought lol.) Actually I know it sound bad but once I have my hands on two female clones I know that I will be just fine
I will post some more a bit later but this will give you a taste of what I have been working on.
Last edited:
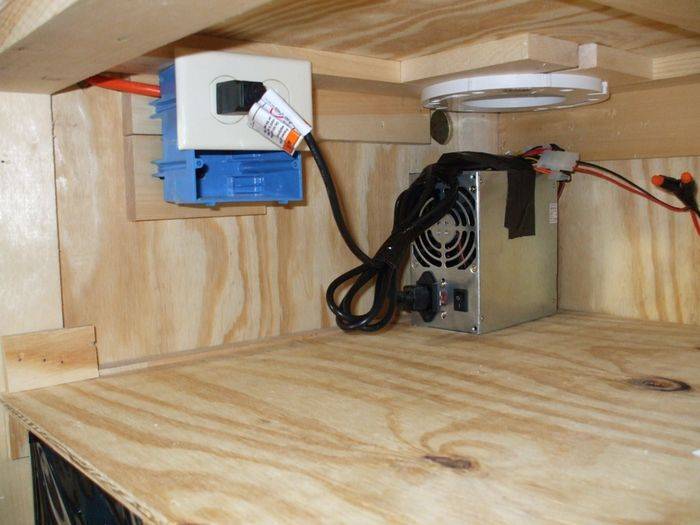
") . The ground is connected too so I have at least some peace of mind, I mean that everything in the box is grounded. That contraption that you see in pic 2 is my power supply unit. It powers all my fans and my water pump. I don't really like having to use it on the pump because it is just another component that can fail at any given time.
. The ground is connected too so I have at least some peace of mind, I mean that everything in the box is grounded. That contraption that you see in pic 2 is my power supply unit. It powers all my fans and my water pump. I don't really like having to use it on the pump because it is just another component that can fail at any given time.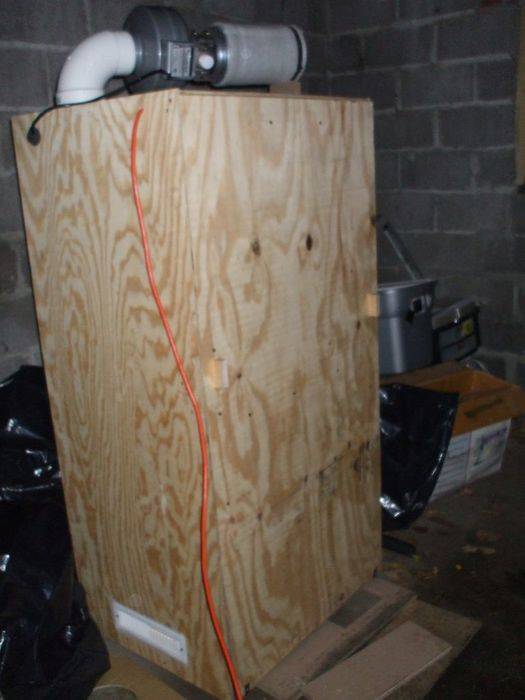

 . I need to buy one last can of flat white and I am DONE with LIGHTPROOFING. So then it is just a matter of germing the seeds, and growing the plant. As soon as I get the aero pod all finished up I will post pictures of the cabinet in full operation minus the plants. I know I know lets get to the freaking plants already right. Well guys I have been patient for months and months while I was saving and building. The time for plants is upon us and I should have them germinating within a week or so. At that point I will start a grow journal and keep it as up to date as I can. Look out for it when it happens these things may grow so fast it will be over before you know it.